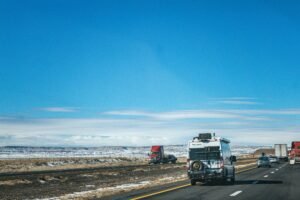
The sound of a tire blowing out on I-40 isn’t just loud; it’s a full-body jolt that sends adrenaline coursing through you. One minute you’re cruising past Oklahoma City, dreaming of the campsite ahead, and the next you’re wrestling thirty thousand pounds of fiberglass and steel to stay in your lane.
Most of these roadside disasters that leave families stranded on the shoulder aren’t just bad luck. They’re the result of small, skipped steps. A good inspection routine is what separates a dream vacation from a rescue mission.
Key Points
- Low pressure creates dangerous heat that leads to blowouts. Check it every morning.
- A trip to a CAT scale with your fully loaded rig is non-negotiable. It ensures you’re not overloading your axles.
- A quick check of fluids, brakes, and suspension before you leave can save you thousands in unexpected repair bills.
- Pack an emergency kit designed for your RV and make sure your roadside assistance is RV-specific.
- Stick to the 3/300 rule no more than 300 miles a day, or stop by 3 PM to stay fresh and avoid driving tired.
- Make sure your tanks are sanitized and your safety detectors are working with a quick monthly check.
Why Your RV's Tires and Weight Are Your Top Priority
The biggest threat to your safety on a long-distance RV trip? Your tires. When a tire fails on a heavy rig, it doesn’t just go flat; it often rips through propane lines, holding tanks, and fiberglass wheel wells before you can even pull over. The main culprit is rarely a nail. It’s the intense heat generated by driving on underinflated tires. Even being underinflated by just 10% can cause internal tire temperatures to skyrocket, pushing the rubber toward a catastrophic failure. Overloading your RV makes this problem even worse, adding a dangerous amount of stress to your suspension and braking systems.
Mastering Tire Pressure and Monitoring
Always check your tire pressure first thing in the morning, when the tires are “cold,” meaning your RV hasn’t moved for at least three hours. Driving warms up the tires and increases the pressure, which can give you a false sense of security. Don’t just go by the maximum pressure written on the tire’s sidewall. Instead, look up your manufacturer’s load–inflation chart to find the perfect PSI for the actual weight you’re carrying. Seasoned RVers aim for a specific target with very little wiggle room. For example, you might target 110 PSI for heavy fifth-wheel tires, allowing for a difference of only ±3 PSI.
Investing in a little technology can be a lifesaver while you’re on the road. A Tire Pressure Monitoring System (TPMS) will alert you in real-time to slow leaks or sudden temperature spikes, often giving you enough warning to pull over safely before a complete blowout.
- You’ll need a high-quality digital tire gauge and a portable air compressor.
- Trusted TPMS brands are TST, TireMinder, and EEZTire.
The CAT Scale Is Your Friend
Guessing your rig’s weight is a dangerous game. Before you go, you need to weigh your RV fully loaded with passengers, a full tank of fuel, fresh water, and all your camping gear packed inside at a certified CAT scale. Then, compare those numbers to your Gross Axle Weight Rating (GAWR) and Gross Combined Weight Rating (GCWR). If you’re over those limits, you’re seriously risking poor braking performance and even suspension failure.
Try to keep heavy items low to the ground and centered between the axles to help your rig stay stable. For those of you pulling travel trailers or fifth wheels, making sure your tongue weight is correct is absolutely essential for preventing dangerous trailer sway.
- The sweet spot for tongue weight is generally 10–15% of your total trailer weight.
- Weigh your RV when it’s fully loaded for a trip and double-check that you’re within all the manufacturer’s ratings to avoid putting deadly stress on your tires.
Inspecting Tire Age, Tread, and Torque
Time is just as tough on your tires as mileage is. The rubber breaks down over the years, whether you’re driving on it or not. Carefully inspect your tires for any cracks in the sidewalls, signs of dry rot, or unusual bulges. A tire might look brand new but could have a hidden structural weakness simply due to its age. Most experts agree that you should replace RV tires every 5 to 7 years, based on their DOT manufacturing date, even if the tread still looks deep.
Another thing you can’t afford to ignore is how tight your lug nuts are. If they become loose, you could lose a wheel at highway speeds.
- Make sure your lug nuts are torqued to the manufacturer’s specification, especially right after you’ve had any wheel service done.
- You should have at least 4/32 of an inch for your steering tires and 2/32 of an inch for your drive tires.
Your Pre-Trip Mechanical and Safety Inspection
Spending $150 to $300 on a professional inspection might seem like a lot, but it can easily prevent a breakdown that could cost you anywhere from $1,000 to $5,000. When you add up the costs of an emergency tow, express shipping for parts, and unexpected hotel stays while you wait for repairs, the value of preventative maintenance becomes crystal clear. Think of this inspection as non-negotiable for anyone planning a big cross-country adventure.
Engine Fluids Check
Your engine goes through a massive amount of stress pulling an RV up steep mountain grades or across scorching deserts. Before you leave, check all your essential fluids; engine oil, transmission fluid, brake fluid, power steering fluid, and windshield washer fluid. Pay special attention to your coolant levels; low coolant can lead to overheating, which is one of the top reasons for engine failure on long drives.
- Many Class C and gas motorhomes need an oil change every 3,000–5,000 miles. But always consult your owner’s manual for the specific guidelines for your rig.
Brakes and Suspension
Bringing all that weight to a stop depends entirely on brakes that are in peak condition. Take a close look at your brake pads, rotors, and drums for any major wear. Check the brake fluid level and keep an eye out for any signs of leaks. Your suspension parts, the shocks, bushings, and leaf springs take a beating from the road. If they’re worn out, your RV will handle poorly and be more likely to sway in the wind.
- Have a certified mechanic inspect your brakes and suspension every year or every 12,000 miles.
Emergency and Roadside Kits
Even if you’re meticulous about maintenance, things can still go wrong. Having a solid plan and the right gear can turn a potential crisis into a manageable inconvenience. It’s a good idea to mentally walk through different breakdown scenarios. Know exactly how you would pull off the road safely, set out your hazard indicators, and shut off your propane supply if you had to.
What to Pack in Your RV Emergency Kit
Put together a dedicated kit that lives in your RV full-time, separate from your regular camping supplies.
- Reflective triangles, high-visibility vests, a fully charged fire extinguisher, and headlamps.
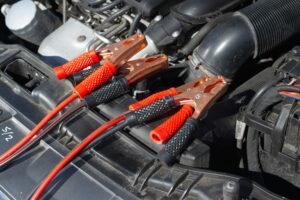
- A basic tool kit, duct tape, spare fuses, and jumper cables or a lithium jump pack.
- A well-stocked first-aid kit, including extra of any prescription medications you need.
Why RV-Specific Roadside Assistance is a Must
Your standard auto club plan probably won’t cut it when it comes to an RV. A regular tow truck simply can’t handle a 40-foot diesel pusher. You need a plan that’s specifically designed for RVs and can provide heavy-duty towing, change out large tires, and help with the complex entry systems on modern rigs. Always keep paper copies of your insurance, registration, and roadside assistance membership in a waterproof folder. You can’t always count on having cell service to pull up digital documents, especially in remote areas.
Mastering Your Route and Driving Pace
Driving an RV takes a lot more mental energy than driving a car. You’re constantly managing a vehicle that’s wider, taller, and heavier, and it reacts much more slowly to your steering. Fatigue can set in quickly, which makes planning your route a crucial part of staying safe.
The 3/300 Rule and Realistic Daily Driving
A great way to stay fresh and safe is to adopt the 3/300 rule. Plan to drive no more than 300 miles in a single day, or make sure you’re parked at your campsite by 3 PM. Following this simple guideline helps you avoid the stress of setting up your camp in the dark, which is when mistakes are more likely to happen.
- When you’re estimating your travel time, use an average speed of 50 mph. This helps account for slower climbs up hills, stops for fuel, and needed rest breaks.
Avoiding Hazards with RV-Specific Navigation
Whatever you do, never trust a standard car GPS to route your RV trip. It could easily send you down a road with a low bridge or onto a parkway where heavy vehicles are banned. Before you go, measure your rig’s total height including the air conditioning units on top and write it on a sticky note you can put on your dashboard.
- Use a service like RV Trip Wizard or an RV-specific GPS unit that lets you filter out routes with low clearances and weight-restricted bridges.
- Choosing an RV under 30 feet can make your life a lot easier, giving you better access to national park campsites and making it simpler to navigate tight fuel stations.
Prepping Your RV's Living Systems
A comfortable and relaxing trip depends on having working utilities. Nothing ruins a perfect campsite arrival like discovering a water leak or a dead heater when you’re hundreds of miles from the nearest town.
Water, Propane, and Holding Tank Readiness
Before you leave, sanitize your freshwater tank to make sure you have clean drinking water for your trip. Check for any leaks under the sinks, around the toilet, and near the water heater. To check your propane system, just spray some soapy water on the connections and look for any bubbles, which would indicate a leak. Make sure you test all your propane appliances, including the stove, refrigerator, and furnace.
- Make sure your black and gray tanks are empty and that the gate valves are working smoothly. It’s also a good idea to inspect your sewer hoses for any cracks.
Climate Control and Safety Detectors
Test both your heating and air conditioning systems before you go. Let them run long enough to be sure they cycle on and off correctly. For better efficiency, give the intake filters on your air conditioner a good cleaning. And remember, your safety detectors are your first line of defense against invisible dangers.
- Test your smoke, carbon monoxide, and LP detectors every month. Put in new batteries once a year.
- Clean your AC filters at least every 6 months.
Securing the Interior for Travel Day
The forces at play inside a moving RV are like a long, slow earthquake. Anything that isn’t secured will shift, fall, and probably break. Having a consistent routine for departure day will protect both your belongings and your passengers.
Your Interior and Exterior Departure Checklist
On the inside, clear off all your counters. Latch the refrigerator doors securely; a heavy jug of milk can easily pop the door open on a sharp turn. Double-check that all your slide-outs are fully retracted and that any travel locks are engaged.
On the outside, retract your awning and make sure it’s locked. Disconnect your shore power, water, and sewer lines. And don’t forget to stow your entry steps and grab handles.
- Always do one last 360-degree walk around your rig. Look for any open compartments, low-looking tires, or antennas you might have left up.
- Use a shared checklist on an app like Apple Notes or Google Keep so that everyone traveling with you can help out.
Your Long-Term RV Maintenance Schedule
A little preventative care now is always cheaper than a big repair later. Sticking to a regular maintenance schedule will ensure your RV stays ready for the road all year long.
Monthly, Seasonal, and Annual RV Tasks
- Once a month, check your tire pressures when they’re cold. Test all your safety detectors. Inspect the seals on your roof for any cracking or peeling sealant. Run your generator for at least an hour under a 50% load to keep the carburetor from getting gummed up.
Every Season (especially Spring), De-winterize your water system and sanitize the fresh tank. Inspect your wheel bearings and brakes. Check your propane lines for leaks.
Once a Year, perform a full chassis inspection and lubrication. Service your generator with a new oil and filter. Check your wheel alignment to prevent uneven tire wear.
For your fluids, change your motorhome’s oil every 3,000–4,500 miles, depending on how you use it and what kind of engine you have.
- Even with the best preparation, the road can be unpredictable. The weather can turn, parts can fail, and other drivers can make mistakes. When you find yourself in the Oklahoma City area and need help you can count on, Five Star Towing is the partner you want on your side. We understand the unique towing needs of RVs, from the biggest Class A motorhomes to travel trailers. Don’t let a breakdown bring your trip to an end; let us get you back on the road safely.
Frequently Asked Questions
The 3/300 rule is a simple guideline for pacing your travel days to help you stay alert and safe behind the wheel.
You limit your driving to no more than 300 miles in a day, OR you stop driving for the day by 3:00 PM whichever one comes first.
Driving a big, heavy RV requires a lot more mental energy and physical effort than driving a car. Experts at places like RV Travel and Roadtrippers have found that fatigue is a major cause of accidents. Stopping by 3:00 PM gives you plenty of daylight to get to your campsite, set up your utilities, and deal with any little mechanical issues that might have popped up during the drive.
Following this rule helps you conserve your energy over the course of a long trip, preventing that built-up exhaustion that can lead to bad decisions on the highway.
You should get in the habit of checking your RV tire pressure before every single travel day, while the tires are still cold.
"Cold" just means the RV hasn't been driven for at least three hours. Driving creates heat, which makes the air inside the tires expand and can hide a dangerously underinflated tire.
Experts at RV Life and Goodyear constantly remind us that tires can lose pressure from drops in the outside temperature or from slow leaks. You can't just eyeball it, a radial tire can look perfectly fine even when it's dangerously low on air.
A quick check in the morning lets you catch a slow leak before you hit the highway, preventing the massive heat buildup that causes catastrophic blowouts.
The three most critical things to check before any long trip are your tires, your fluid levels, and your weight distribution.
Your tires need to be inflated to the correct pressure for the load you're carrying. Your engine oil, coolant, and transmission fluid need to be topped off. And your fully loaded rig needs to be weighed to make sure you're not over your limits.
According to industry leaders like Hensley Mfg and Lippert, these three areas are responsible for the vast majority of preventable roadside breakdowns. Ignoring your weight limits puts a huge amount of stress on everything from your transmission to your brakes.
Focus on these three big items before you worry about cosmetic or comfort-related checks. A broken air conditioner is an inconvenience; a blown tire or an overheated engine is a full-blown safety emergency.
Your emergency toolkit should absolutely include a torque wrench, a digital tire gauge, a multimeter, and a variety of spare fuses.
You'll also want a high-quality portable air compressor that can reach the high PSI your RV tires require, a set of heavy-duty jumper cables, and a basic mechanic's tool set (with wrenches, screwdrivers, and a socket set).
Folks at Camping World and Lippert point out that many common RV problems, like a blown fuse or a loose battery cable, can be fixed in just a few minutes if you have the right tool on hand. Without it, you're stuck waiting for a tow.
Carrying these tools lets you handle the small stuff yourself, so you can save your roadside assistance calls for major mechanical failures that you truly can't fix on your own.
The only way to do it right is to use a certified CAT scale and to weigh your rig when it's fully loaded, exactly as it would be when you're leaving for your trip.
Drive your RV onto the scale with a full tank of fuel, a full fresh water tank (if you travel with it full), all your passengers, and all your gear. You'll need to get separate weight readings for your steer axle, your drive axle, and your trailer or towed vehicle.
Compare those weights to the Gross Vehicle Weight Rating (GVWR) and Gross Axle Weight Ratings (GAWR) that are printed on your vehicle's data plate. As the experts at RV Trip Wizard note, it's still dangerous to be over on just one axle, even if your total weight is under the limit.
If you find out you're overweight, you have to either leave some gear behind or redistribute the load to get back within the safe operating limits for your brakes and tires.
As a general rule, your generator will need an oil and filter change every 100 to 150 hours of operation, or at least once a year, whichever comes first.
On top of the oil changes, you should make a point to run your generator under about a 50% load for an hour or so every month.
According to the guidelines from Cummins/Onan, running the generator regularly prevents moisture from building up in the windings and stops the fuel from going bad and gumming up the carburetor.
Treat your generator service with the same importance as your engine's oil change. A neglected generator is the number one reason for losing power when you're boondocking.
You should always use an RV-specific GPS or a planning app like RV Trip Wizard instead of the standard mapping apps on your phone.
Standard apps like Google Maps assume you're driving a car. They have no idea about low bridges, tunnels with propane restrictions, or roads with weight limits that your RV can't handle.
RV Life has highlighted that thousands of bridge strikes happen every year because commercial and recreational drivers are just following their car navigation.
Before you go, input your RV’s exact height, length, and weight into your navigation device. This will make sure the route it gives you only includes roads that are built to handle a vehicle of your size.
A good checklist should cover three main areas: securing everything inside, retracting all the exterior components, and doing a final safety walk-around.
Latch your fridge and all your cabinets. Retract your slide-outs and awnings. Disconnect and properly stow your power, water, and sewer lines. Check that your jacks are all the way up.
Experienced RVers from channels like Changing Lanes and companies like Grand Design RV always recommend doing a physical walk-around as your very last step. This is your chance to catch any mistakes, like an antenna that's still up or an open storage bay door.
Following a physical or digital list helps prevent "departure blindness," that thing that happens when you're so used to the routine that you overlook obvious safety problems.
Yes, it absolutely is. Your standard auto insurance or roadside plan often doesn't have the capability to handle a heavy RV.
A typical tow truck can't lift a Class A motorhome or a heavy fifth-wheel trailer. You need a specialized heavy-duty wrecker, which costs a lot more.
RV-specific plans (from providers like Coach-Net or Good Sam) will cover towing to the nearest qualified repair facility, not just the closest garage. As Emergency Assistance Plus notes, many of these plans also help cover trip interruption expenses like hotels or rental cars.
When you're choosing a plan, make sure it covers "unlimited towing distance" or at least enough mileage to get you to a major city, because RV mechanics can be hard to find in rural areas.
Preventing a blowout comes down to three key things: maintaining the correct tire pressure, managing your weight, and replacing tires before they get too old.
Use a Tire Pressure Monitoring System (TPMS) to keep an eye on your pressure while you're driving. Never load your RV beyond the tire's maximum load rating. And when your RV is parked for a while, cover the tires to protect them from damaging UV rays.
Information from tire giants like Goodyear and Michelin clearly shows that the intense heat created by driving on underinflated tires is the number one cause of sidewall failure.
Replace your tires every 5 to 7 years, no matter how much tread is left. The internal damage from age is invisible, but it can be deadly on the highway.
The general consensus among industry experts is that you should replace your RV tires when they are between 5 and 7 years old, based on their date of manufacture.
Look for the 4-digit DOT code on the sidewall of your tire. The last two digits tell you the year it was made (for example, a code ending in "23" was made in 2023).
Over time, the rubber compounds in the tire oxidize and become brittle. Warnings from the National Highway Traffic Safety Administration (NHTSA) show that older tires are far more likely to have their tread separate from the rest of the tire.
Don't try to push your luck and get 10 years out of a set of tires. The cost of buying new tires is just a tiny fraction of the cost of the damage a blowout can cause at 65 mph.
You'll want to check your engine oil, transmission fluid, coolant, power steering fluid, brake fluid, and windshield washer fluid.
Your engine oil and coolant are absolutely critical for keeping your engine from overheating. Being low on coolant while climbing a long, steep hill can be enough to seize your engine.
Experts at Geico and Northgate Parts advise checking these fluids when the engine is cold and the RV is on level ground to get the most accurate readings.
Carrying a spare quart of oil and a gallon of pre-mixed coolant with you is a smart move. It allows you to fix minor issues right away instead of risking serious engine damage.
You can easily sanitize your water system with a simple bleach solution that will kill any bacteria or mold growing inside.
Use about 1/4 cup of regular household bleach for every 15 gallons of your water tank's capacity.
First, dilute the bleach in a gallon of water, then pour it into your empty fresh water tank. Fill the tank completely with fresh water, then turn on your water pump and run it until you can smell bleach coming out of every faucet (hot and cold). RV resources like Sanidumps and RV Share recommend letting that solution sit in the system for at least 4 hours. Afterwards, drain the entire system and flush it with fresh water until the bleach smell is completely gone.
This simple bit of maintenance can prevent you from getting sick from waterborne illnesses and ensures your water is safe to use for cooking and showering.